ORP Sensor User Manual
Order Code: ORP-BTA
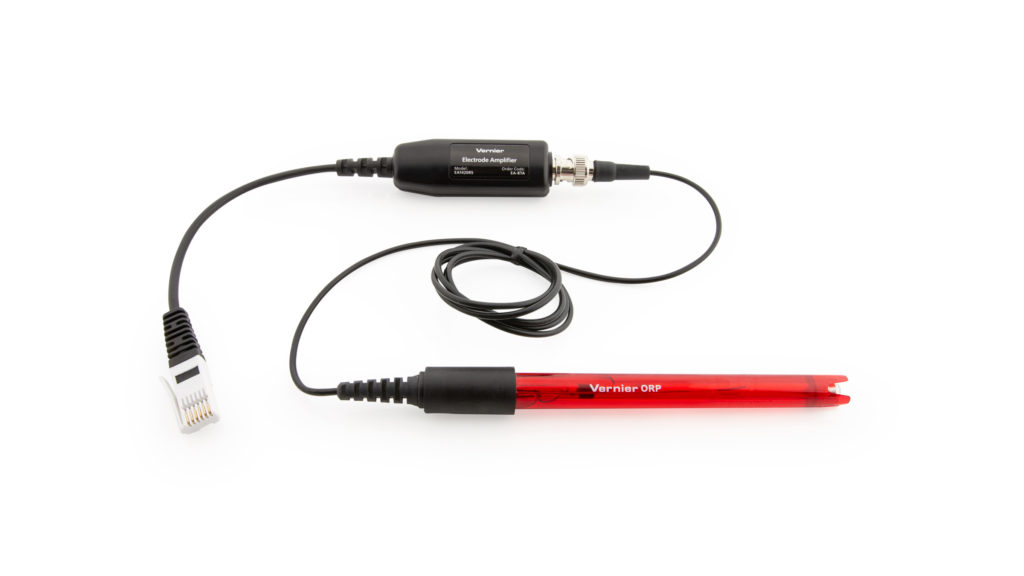
The ORP Sensor measures the ability of a solution to act as an oxidizing agent or reducing agent. ORP stands for oxidation-reduction potential. For example, ORP electrodes are often used to measure the oxidizing ability of chlorine in swimming pools, or to determine when the equivalence point has been reached in an oxidation-reduction reaction.
Compatible Software
Choose a platform below to see its compatibility requirements.LabQuest
Interface LabQuest App LabQuest 3 Full support LabQuest 2 Full support LabQuest Full support Computers
Software Interface Graphical Analysis Graphical Analysis (Web App) Logger Pro (discontinued) Logger Lite (discontinued) LabQuest Mini Full support Full support Full support Full support LabQuest 3 Full support Full support Full support Incompatible LabQuest 2 Full support Full support Full support Full support LabQuest Stream Full support 1 Full support 1 Partial support 2 Full support 1 Go!Link Full support Full support Full support Full support LabQuest Full support Full support Full support Full support LabPro Incompatible Incompatible Full support Full support Compatibility Notes
Chromebook
Software Interface Graphical Analysis (Web App) LabQuest Mini Full support LabQuest 3 Full support LabQuest 2 Full support LabQuest Stream Full support 1 Go!Link Full support LabQuest Full support Compatibility Notes
iOS
Software Interface Graphical Analysis Graphical Analysis GW LabQuest Stream Full support Full support LabQuest 3 Full support 1 Full support 1 LabQuest 2 Full support 1 Full support 1 Compatibility Notes
Android
Software Interface Graphical Analysis Graphical Analysis GW LabQuest Stream Full support Full support LabQuest 3 Full support 1 Full support 1 LabQuest 2 Full support 1 Full support 1 Compatibility Notes
Arduino
Software Interface Arduino Vernier Arduino® Interface Shield Full support LabVIEW
Software Interface NI LabVIEW SensorDAQ Full support Vernier myDAQ Adapter Full support 1 Go!Link Full support LabQuest Mini Full support LabQuest Stream Full support LabQuest 3 Full support LabQuest 2 Full support LabQuest Full support Compatibility Notes
Texas Instruments
Software Interface EasyData DataMate TI-84 SmartView DataQuest TI-Nspire Software EasyLink Full support 1 Incompatible Full support 2 Full support Full support 2 CBL 2 Full support 3 Full support 3 4 Incompatible Incompatible Incompatible LabPro Full support 3 Full support 3 4 Incompatible Incompatible Incompatible TI-Nspire Lab Cradle Incompatible Incompatible Incompatible Full support Full support Compatibility Notes
Quick Start
- Plug the sensor into the interface (LabQuest 3, LabQuest Mini, etc.).
- Connect the interface to your device.
- If using USB, connect to the USB port on your computer.
- If using Bluetooth® wireless technology, click your interface type and then select your device.
- Prepare for data collection:
- Vernier Graphical Analysis®: Launch the app, if necessary, and click Sensor Data Collection.
- LabQuest® App: Choose New from the File menu.
The software will identify the sensor and load a default data-collection setup. You are now ready to collect data.
Note: Do not completely submerge the sensor. The handle is not waterproof.
Need Additional Information?
Visit the following link:
www.vernier.com/start-lq-sensor
Note: Vernier products are for educational use only.
Calibrating the Sensor
Optional Calibration Procedure
In most experiments done with an ORP Sensor the precise potential in mV is not critical; rather, the large change in potential is the most important factor. As a result, you should not have to perform a new calibration when using the ORP Sensor for most experiments. You can simply use the appropriate calibration that is stored with this auto-ID sensor.
If you are doing water quality testing or performing a chemistry experiment that requires a very accurate calibration, you will need two commercial ORP standards. Using these standards, perform the following calibration, using the
2-point calibration option in all Vernier data-collection programs (this calibration assumes you have two ORP calibration standards, one at 100 mV, another at 300 mV):
- For the first calibration point, rinse the tip of the electrode with distilled water, and place the electrode into the first standard. When the voltage reading displayed by the data-collection program stabilizes, enter the mV value of the first ORP standard (e.g., 100).
- For the second calibration point, remove the electrode from the first standard, rinse it with distilled water, and place it into the second standard. When the voltage stabilizes, enter the mV reading of the second standard (e.g., 300).
- Rinse the electrode with distilled water and place it into the sample. You are now ready to take measurements with the calibrated ORP Sensor.
When you are finished making measurements, rinse the electrode with distilled water. Slide the cap onto the electrode body, and then screw the cap onto the storage bottle so the tip of the electrode is immersed in the storage solution.
Specifications
ORP Electrode
|
Type |
Sealed, gel-filled, epoxy body, Ag/AgCl reference |
|
Storage solution |
pH-4/KCl solution (10 g KCl in 100 mL buffer pH-4 solution) |
|
Cable |
1 meter coaxial cable with BNC connector |
|
Temperature Range |
0–60°C |
|
Probe Dimensions |
12mm OD |
|
Impedance |
~20 kΩ at 25°C |
|
ORP element |
99% pure platinum band sealed on a glass stem |
Electrode Amplifier (included with each ORP Sensor)
|
Calibration |
slope: 466.875 |
|
Resolution |
0.5 mV
|
|
Power |
7 mA @ 5VDC |
|
Input Range |
–450 to 1100 mV |
Suggested Experiments
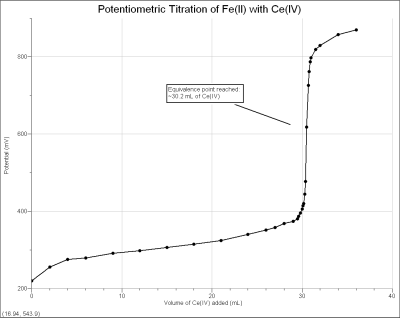
The ORP Sensor can be used to perform a potentiometric titration. This is a fairly common experiment in AP Chemistry or college general chemistry classes. When a redox titration just exceeds its equivalence point volume, the potential measured by an ORP electrode will increase rapidly (if there is an excess of oxidizing agent) or decrease rapidly (with excess reducing agent), as seen in the graph below.

In the reaction for the titration curve shown previously
Ce4+ + Fe2+ → Fe3+ + Ce3+
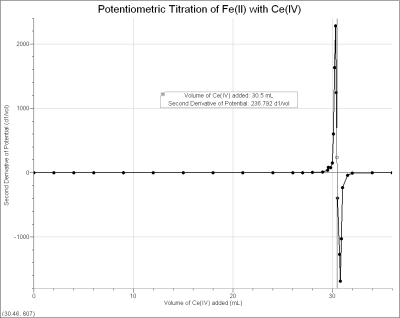
a solution containing Fe2+ of unknown concentration is titrated with an oxidizing agent, ~0.1 M Ce4+ standard solution (from (NH4)2Ce(NO3)6). When the equivalence point is reached, and excess Ce4+ is added, a large increase in potential results. By examining these data, or performing a second derivative (also shown) or Gran plot, the equivalence point of the titration can easily be determined. With Vernier Graphical Analysis 4 software, the experiment can be done in one of two ways: using the ORP Sensor in Events with Entry mode (where buret volumes are manually entered) or using the Vernier Drop Counter to measure titrant volumes.

Care and Maintenance
Do not completely submerge the sensor. The handle is not waterproof.
Do not wrap the cable tightly around the sensor for storage. Repeatedly doing so can irreparably damage the wires and is not covered under warranty.
How the Sensor Works
The electrode has two components: a measuring half cell comprised of platinum metal immersed in the solution in which the redox reaction is taking place, and a reference half cell (sealed gel-filled Ag/AgCl) to which the platinum half cell is referenced.
The Vernier ORP can measure redox potential in the range of –450 to
+1100 mV. Readings toward the positive region of this range indicate a strong oxidizing agent, while readings toward the negative region indicate a strong reducing agent.
Troubleshooting
For best results when using the ORP sensor with a drop counter, add drops at a rate of one per two seconds.
For troubleshooting and FAQs, see www.vernier.com/til/1437
Repair Information
If you have followed the troubleshooting steps and are still having trouble with your ORP Sensor, contact Vernier Technical Support at support@vernier.com or call 888-837-6437. Support specialists will work with you to determine if the unit needs to be sent in for repair. At that time, a Return Merchandise Authorization (RMA) number will be issued and instructions will be communicated on how to return the unit for repair.
Warranty
Warranty information for this product can be found on the Support tab at www.vernier.com/orp-bta/#support
General warranty information can be found at www.vernier.com/warranty
Contact Support
Fill out our online support form or call us toll-free at 1-888-837-6437.

