Power Amplifier Accessory Speaker User Manual
Order Code: PAAS-PAMP
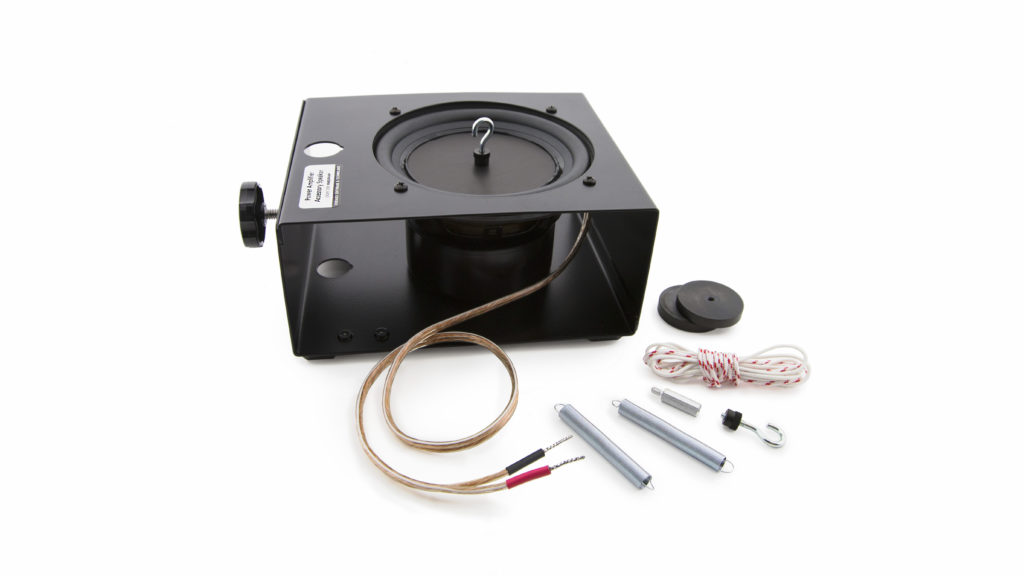
This kit includes a speaker and accessories used with the Vernier Power Amplifier to study mechanical waves and springs. The speaker contains a light weight metal disc glued to the speaker cone. A drive post attached to the metal plate allows you to connect objects such as strings and springs. The Power Amplifier Accessory Speaker is normally connected to the Vernier Power Amplifier which is connected to a device that drives the amplifier (see www.vernier.com/til/15045). Experiments include
- Observing standing waves on a string including harmonics
- Measuring the speed of a wave on a string
- Observing resonance in simple harmonic motion
Note: Vernier products are designed for educational use. Our products are not designed nor are they recommended for any industrial, medical, or commercial process such as life support, patient diagnosis, control of a manufacturing process, or industrial testing of any kind.
What's Included
- Power Amplifier Accessory Speaker
- 5 ¼ inch shielded speaker with an adaptable driver post (1)
- elastic string (1)
- braided nylon-core cord (1)
- spacer (1)
- springs with different spring constants (2)
- masses (2)
- threaded hooks (2)
Getting Started
Software Setup
Using a Function Generator
Nearly all function generators, such as the Frequency Generator (FGEN-PAMP), can be used as an input signal for the Power Amplifier.
- Connect the Power Amplifier to the frequency generator.
- Adjust the Amplitude to give the desired range. Note: The Power Amplifier audio input line applies a 10× amplification to the input signal. A 0.3 input produces a signal having a 3V range centered at 0V (i.e., ±1.5 V sinusoidal signal).
- Adjust the Frequency and Waveform to the desired settings.
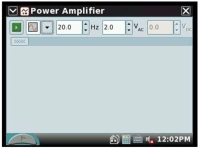
Using LabQuest 3, LabQuest 2, or original LabQuest with Power Amplifier LabQuest Apps
If you are using LabQuest 3, LabQuest 2, or the original LabQuest with the Power Amplifier and speaker, control is provided by an app on the LabQuest.
- Connect the Power Amplifier to the LabQuest audio out port. (See the Power Amplifier user manual for connection instructions.)
- Tap the Home button.
- Choose Power Amplifier app.
- Use this app to control the waveform, frequency, and amplitude of the signal.
- If you want to also collect data while the speaker is being driven, you can switch to the LabQuest App to set up and collect data.
Using a computer sound card and the Power Amplifier App (computers)
The Power Amplifier can use the output of your computer’s sound card as an input signal. Our Power Amplifier Function Generator software mimics the LabQuest’s Power Amplifier App to do so. (Windows computers only)
- Connect the Power Amplifier to the audio port on your computer.
- Make sure the computer sound output is turned on.
- Launch the Power Amplifier App.
- Use the program to control the waveform, amplitude and frequency.
Using LabQuest 3, LabQuest 2, or original LabQuest with Logger Pro
If you are using a computer and LabQuest, software control can be provided in Logger Pro.
- Connect the Power Amplifier to a LabQuest, and power up the Power Amplifier. (See the Power Amplifier user manual for connection instructions.)
- Wire the Power Amplifier to the Power Amplifier Accessory Speaker.
- In Logger Pro, choose Set Up Sensors in the Experiment menu and choose Show All Interfaces.
- A dialog box will appear. Click the Power Amplifier button.
- The Power Amplifier dialog box will appear. Use this dialog box to control the waveform, frequency and amplitude of the signal.
- While the speaker is being driven, you can also collect data with Logger Pro.
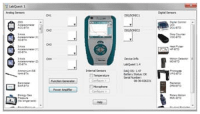
Figure 1
|
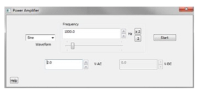
Figure 2
|
Using LabPro with Logger Pro
If you are using a computer and LabPro, software control is provided in Logger Pro.
- Connect the Power Amplifier to a LabPro and power up the Power Amplifier. (See the Power Amplifier user manual for connection instructions.)
- Wire the Power Amplifier to the Power Amplifier Accessory Speaker.
-
In Logger Pro choose Set Up Sensors from the Experiment menu and choose the LabPro. A dialog box will appear. To the left of the LabPro graphic, you will see a list of the four analog channels. The Power Amplifier will appear in channel CH4. Note that the default setting for the Power Amplifier is to measure current in amperes; however, LabPro cannot simultaneously measure current through channel CH4 and drive a signal through this channel. Therefore the next three steps will instruct you how to reconfigure this channel.
 Figure 3
 - Click the icon that represents channel CH4. A pop up dialog box will appear.
- Select Choose Sensor. A list of sensors will appear. Scroll through the list and choose Voltage and then choose Raw Voltage (+/- 10 V).
- Once again click the CH4 icon but now select Analog Out.
- The Analog Out dialog box will appear. Use this dialog box to control the waveform, frequency, and amplitude of the signal. Click the OK button to start sending the signal from LabPro to the Power Amplifier. Note: A gain of a factor of two is applied to the LabPro input, so that a LabPro output of 1 V results in a Power Amplifier output of 2 V.
- Return to the Analog Out dialog box to modify the signal setting.
- While the speaker is being driven, you can also collect data with Logger Pro.
Using a LabPro with FunctGen App (TI-83 Plus or TI-84 Plus)*
A LabPro can be connected to a TI-83 Plus or TI-84 Plus graphing calculator. You are able to drive the speaker with a program called FunctGen on the calculator. You will not be able to simultaneously use sensors with the LabPro.
- Connect the Power Amplifier to a LabPro. (See the Power Amplifier user manual for connection instructions.)
- Connect the graphing calculator to the LabPro.
- Start the FunctGen program on the calculator. (The FunctGen program is also a part of the VSTApp application. Both the program and application can be downloaded from vernier.com.)
-
Use the program to control the waveform, amplitude and frequency. Note: A gain of a factor of two is applied to the LabPro input, so that a LabPro output of 1 V results in a Power Amplifier output of 2 V.
*LabPro cannot be used with a TI-84-Plus CE or a TI-84 Plus calculator made after 2022.
Using SensorDAQ and LabVIEW
- Connect the Power Amplifier to the SensorDAQ using the screw terminal connections and the BTA connector on the Power Amplifier. (See the Power Amplifier user manual for connection instructions.)
- Wire the Power Amplifier to the Power Amplifier Accessory Speaker.
- Open a sample VI that controls the SensorDAQ analog output. Remember that the voltage is doubled by the Power Amplifier, so you should keep the peak voltage out of SensorDAQ at 2.5 volts or lower. SensorDAQ can update the analog output voltage 150 times/second so you should be able to use frequencies up to 20 or 30 Hz.
Using the Product
Software and Hardware Combinations
The speaker is driven by the Power Amplifier, which is software controlled by your computer, handheld, or external Function Generator. This kit and the Power Amplifier can be used with the Vernier LabQuest 3, LabQuest 2, original LabQuest, or Vernier LabPro. Some combinations of equipment allow you to drive the speaker and simultaneously collect data.
Using the Power Amplifier Speaker with the Power Amplifier
The Power Amplifier Speaker has rubber feet on the bottom of the case for secure placement on a table. The case has a 3/4 inch hole that is used to mount the speaker on a ring stand. Leads from the speaker are used to connect it to the output of the Power Amplifier. When this speaker is used with the Power Amplifier, the maximum recommended signal is ± 5 volt peak amplitude. Signals above 5 volts will exceed the 1 ampere current limit of the amplifier, and the signal will be distorted.
Performing Experiments
Observing standing waves and harmonics
- Place the speaker on the table and connect the Power Amplifier.
- Attach the threaded hook screw to the driver plate. (Note: A small spacer is included with the equipment. It can be placed between the hook screw and the driver plate to elevate the hook screw.) Attach the elastic string to the hook screw.
- Attach the other end of the elastic to a ring stand.
-
Move the speaker box to create tension in the string.
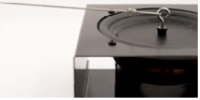 Figure 5
 - Use the software to generate a sine wave with a 4 V amplitude and a frequency of around 15 Hz.
- Adjust the tension in the string until you have a standing wave for the fundamental frequency.
- Double the frequency. Describe the change in the standing wave.
- Triple the fundamental frequency. Describe the change in the standing wave.
- Try quadrupling the frequency.
Measuring the speed of a wave on a nylon-core cord
- Place the speaker on the table and connect the Power Amplifier.
- Attach a Dual-Range Force Sensor to a ring stand.
- Attach the threaded hook screw to the driver plate.
- Attach the cord to the hook screw post on the speaker.
- Attach the other end of the cord to the force sensor.
- Move the speaker box to create tension in the cord.
- Use the software to generate a sine wave with an amplitude of 4 V and a frequency about 15 Hz.
- Adjust the tension in the cord until you have a standing wave of the fundamental frequency.
- Use the data collection software and Dual-Range Force Sensor to determine the tension in the cord. Measure the mass of the cord, and then use the theoretical formula for the velocity of a wave in a cord to compute the velocity of the wave: V = SQRT[T/(m/L)]
- Knowing that the speed of the wave is equal to frequency multiplied by the wavelength, determine the speed of the wave.
- Compare the velocities as determined in steps 9 and 10.
Observe resonance on a spring
- Attach the threaded hook screw to the driver plate.
- Attach the speaker to a ring stand with the speaker facing down.
- Attach one end of the spring to the hook screw on the speaker.
-
Attach a weight to the other end of the spring.
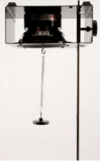 Figure 6
 - Knowing the spring constant of the spring and the mass of the weight, calculate the period and frequency with which the mass will oscillate.
- Use the software to generate a sine wave with an amplitude of 4 V and a frequency of about 1 Hz. Observe the motion of the mass.
- Increase the frequency slightly, e.g., 0.2 Hz. Observe the motion of the mass.
- Continue to increase the frequency and approach the frequency calculated in Step 4 above.
- Describe the motion of the weight when that frequency is reached.
- Repeat the above with another spring and weight combination.
Specifications
|
Speaker |
5 1/4 inch shielded woofer, 30 W max, 8 Ω impedance, 5.8 Ω DC resistance |
|
Spring (relatively soft) |
Spring constant is approximately 5 N/m |
|
Spring (stiffer) |
Spring constant is approximately 15 N/m |
Repair Information
If you have watched the related product video(s), followed the troubleshooting steps, and are still having trouble with your Power Amplifier Accessory Speaker, contact Vernier Technical Support at support@vernier.com or call 888-837-6437. Support specialists will work with you to determine if the unit needs to be sent in for repair. At that time, a Return Merchandise Authorization (RMA) number will be issued and instructions will be communicated on how to return the unit for repair.
Warranty
Warranty information for this product can be found on the Support tab at www.vernier.com/paas-pamp/#support
General warranty information can be found at www.vernier.com/warranty
Disposal
When disposing of this electronic product, do not treat it as household waste. Its disposal is subject to regulations that vary by country and region. This item should be given to an applicable collection point for the recycling of electrical and electronic equipment. By ensuring that this product is disposed of correctly, you help prevent potential negative consequences on human health or on the environment. The recycling of materials will help to conserve natural resources. For more detailed information about recycling this product, contact your local city office or your disposal service.
Contact Support
Fill out our online support form or call us toll-free at 1-888-837-6437.