Advanced Wind Experiment Kit Nacelle User Manual
Order Code: KW-AWXN
This kit enables a number of advanced experiments, especially with GENPack generator module. Try different gear ratios, blade designs, generators, and more, in a creative, hands-on inquiry into wind energy science. This nacelle also converts for conducting weightlifting experiments, making it a great option for studying mechanical and electrical energy.
Note: Vernier products are designed for educational use. Our products are not designed nor are they recommended for any industrial, medical, or commercial process such as life support, patient diagnosis, control of a manufacturing process, or industrial testing of any kind.
What's Included
- Gear Set with Spool
- Wind Turbine Generator with Wires
- High Torque Generator with Wires
- Motor Mount Pack (2)
- Wind Turbine Hub
- Nacelle Body Half (2)
- Plastic Weightlifter Bucket
- Blade Pitch Protractor
- 1/2 Washer (25)
- 8” Hex Shaft with Hub Quick Connect
- 1/4 × 5” Dowels* (25)
- 3” × 12” × 3/32” Balsa Wood Sheet* (5)
- 4’ String*
*This part is a consumable and is excluded from warranty.
Note: This kit does not include the parts required for building a tower to hold the nacelle upright. For the complete kit, see the KidWind Advanced Wind Experiment Kit.
Assembly Instructions
Detailed assembly instructions are provided in a step-by-step video athttps://www.youtube.com/watch?v=Sq_kK0U4vrY
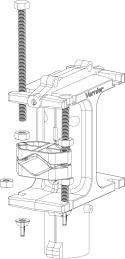
Assembling the Nacelle and Motor Mount
- Place the two nacelle halves together.
- Using a Phillips-head screwdriver and the screws from the motor mount kit, secure the two nacelle halves together. Each side of the nacelle requires four screws to secure it together (see Figure 1).
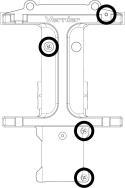
- Screw in a hex nut about two-thirds the way up a bolt.
- Slide the two motor mount sections, one at a time, up the bolt so that the two concave sections are facing each other.
- Screw another hex nut onto the bolt under the motor mounts to hold them in place (see Figure 2).
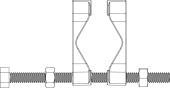
- Slide the bolt (with nuts and mount) into the cutout on the nacelle.
- Attach a wing nut onto the bottom of the bolt so that it is secured to the nacelle (see Figure 3).
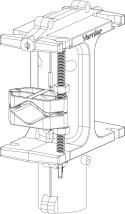
- Screw a hex nut onto a second bolt (about one-third of the way up).
- Slide that bolt into the top cutout and through the motor mounts.
- Screw a hex nut onto the bolt under the mounts.
- Move the hex nut up the bolt so that you can slide the bolt down all the way to the bottom cutout.
- Secure the second bolt with another wing nut, repeating what was done for the first bolt (see Figure 4).
Attaching the Generator to the Nacelle
- Loosen the motor mounts on the nacelle until the generator can fit between them.
-
Tighten the nuts up and down onto the motor mount to hold the generator securely in place.
Optional: If you are using a PVC tower, you can snake the wires from the motor through the slot in the nacelle behind the motor mount. Then the wires can go down through the PVC pipe. On a wood tower, the wires can go to the side of the nacelle. You can attach the wires to the wood tower with zip-ties or tape.
- Attach the smallest gear (pinion) to the driveshaft of the generator by pressing it on firmly with your fingers.
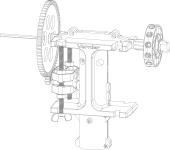
Attaching the Hex Driveshaft and Gear
- Slide a hex lock about two-thirds the way onto the driveshaft with the flange facing the nacelle.
- On the side opposite of the generator, slide the driveshaft, with the attached Hub Quick Connect, into the hole at the top of the nacelle.
- Slip a second hex lock onto the driveshaft with the flange facing the nacelle.
- Place the 16-, 32-, or 64-tooth gear onto the driveshaft and press it onto the hex lock.
- Move your generator up or down by adjusting the hex nuts so that the pinion gear meshes with the gear on the driveshaft (see Figure 5).
Generators
The Advanced Wind Experiment Kit Nacelle comes with two DC generators: a standard generator and a high torque generator. The standard generator is the primary generator for wind turbine experiments because it runs smoothly and provides high power output at a relatively low RPM. The high torque generator produces lower voltage, but higher current, for a given rotor RPM. If using the water pump as part of your experiment, the high torque generator should be used.
Two Do-It-Yourself generator options are available (purchased separately) to further investigate generator construction: KidWind simpleGEN (KW-SGEN) and GENPack (KW-GP). The simpleGen replaces the nacelle while the GENpack fits into the nacelle. For more information see www.vernier.com/til/13082
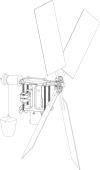
Converting to the Weightlifting Turbine
ou can convert your Advanced Wind Experiment Kit Nacelle to a weightlifting turbine. Lifting weights with the wind turbine is another great way to explore wind energy and provide students with a simple visual display of mechanical work. To convert the kit to a weightlifting turbine, watch the assembly video at https://www.youtube.com/watch?v=Sq_kK0U4vrY
- Remove the larger gear from the hex driveshaft, but leave hex lock on it. Note: You may wish to remove the generator, but it is not required.
- Push the wooden spool to lock into this hex lock, then insert the second hex lock behind the spool. The neck of the hex lock will fit inside the drilled hole of the spool.
- Attach one end of the string securely to the cup. This cup will hold your weights; a set of metal washers are provided for this purpose.
- Tie and tape the other end of the string onto the spool. The tape prevents the string from slipping.
Troubleshooting
Information and troubleshooting tips can be found at https://www.vernier.com/kw-awxn/til
Accessories/Replacements Parts
| Accessory | Order Code |
|---|---|
| KidWind Tower and Base Set |
KW-TBS |
|
GDX-NRG |
|
|
VES-RB |
|
|
VES-VL |
|
|
KW-GP |
|
| Replacement Part | Order Code |
|
KW-BDC |
|
| KidWind Gear Set |
KW-GEAR |
| Drivetrain Set |
KW-DS |
|
KW-BPP |
|
|
KW-MTRMNT |
|
|
KW-HIGEN3 |
|
|
KW-WTH10 |
|
|
KW-TH3 |
|
|
KW-GEN10 |
|
|
KW-GEN3 |
|
|
KW-CB50 |
|
|
KW-D25 |
|
|
KW-D100 |
|
|
KW-BBS10 |
|
|
KW-BB100 |
Warranty
Warranty information for this product can be found on the Support tab at www.vernier.com/kw-awxn/#support
General warranty information can be found at www.vernier.com/warranty
Contact Support
Fill out our online support form or call us toll-free at 1-888-837-6437.