Flow Rate Sensor User Manual
Order Code: FLO-BTA
The Flow Rate Sensor measures the velocity of water in a river, stream, or canal. It can be used to study the discharge, flow patterns, and sediment transport of a stream or river.
Note: Vernier products are designed for educational use. Our products are not designed nor are they recommended for any industrial, medical, or commercial process such as life support, patient diagnosis, control of a manufacturing process, or industrial testing of any kind.
What's Included
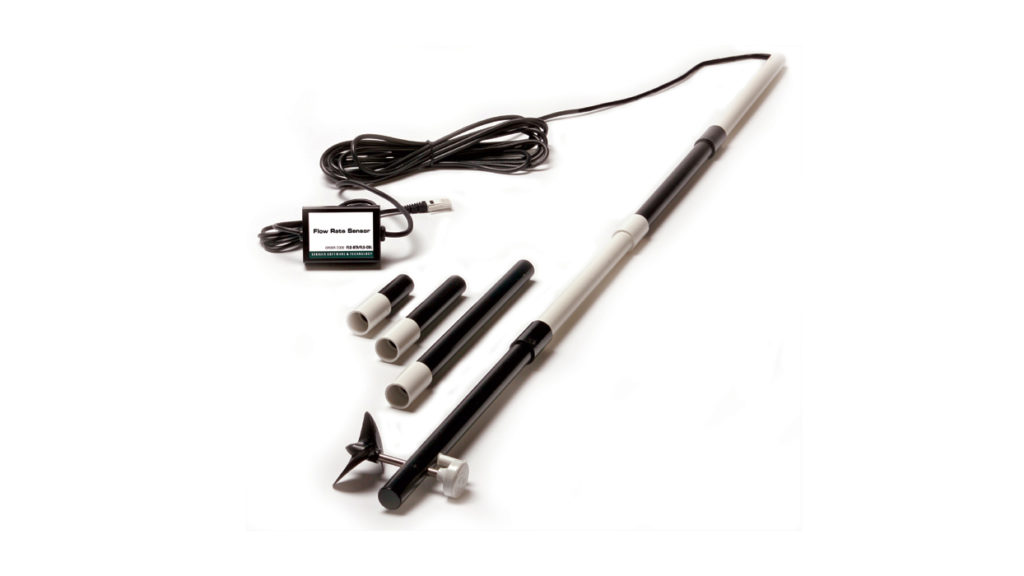
- Flow Rate Sensor (impeller rod with 5 meter cable)
- Three riser rods (short, medium, and long)
Compatible Software
Choose a platform below to see its compatibility requirements.LabQuest
Interface LabQuest App LabQuest 3 Full support LabQuest 2 Full support LabQuest Full support Computers
Software Interface Graphical Analysis Graphical Analysis (Web App) Logger Pro (discontinued) Logger Lite (discontinued) LabQuest Mini Full support Full support Full support Full support LabQuest 3 Full support Full support Full support Incompatible LabQuest 2 Full support Full support Full support Full support LabQuest Stream Full support 1 Full support 1 Partial support 2 Full support 1 Go!Link Full support Full support Full support Full support LabQuest Full support Full support Full support Full support LabPro Incompatible Incompatible Full support Full support Compatibility Notes
Chromebook
Software Interface Graphical Analysis (Web App) LabQuest Mini Full support LabQuest 3 Full support LabQuest 2 Full support LabQuest Stream Full support 1 Go!Link Full support LabQuest Full support Compatibility Notes
iOS
Software Interface Graphical Analysis Graphical Analysis GW LabQuest Stream Full support Full support LabQuest 3 Full support 1 Full support 1 LabQuest 2 Full support 1 Full support 1 Compatibility Notes
Android
Software Interface Graphical Analysis Graphical Analysis GW LabQuest Stream Full support Full support LabQuest 3 Full support 1 Full support 1 LabQuest 2 Full support 1 Full support 1 Compatibility Notes
Arduino
Software Interface Arduino Vernier Arduino® Interface Shield Full support LabVIEW
Software Interface NI LabVIEW SensorDAQ Full support Vernier myDAQ Adapter Full support 1 Go!Link Full support LabQuest Mini Full support LabQuest Stream Full support LabQuest 3 Full support LabQuest 2 Full support LabQuest Full support Compatibility Notes
Texas Instruments
Software Interface EasyData DataMate TI-84 SmartView DataQuest TI-Nspire Software EasyLink Full support 1 Incompatible Full support 2 Full support Full support 2 CBL 2 Full support 3 Full support 3 4 Incompatible Incompatible Incompatible LabPro Full support 3 Full support 3 4 Incompatible Incompatible Incompatible TI-Nspire Lab Cradle Incompatible Incompatible Incompatible Full support Full support Compatibility Notes
Quick Start
- Plug the sensor into the interface (LabQuest 3, LabQuest Mini, etc.).
- Connect the interface to your device.
- If using USB, connect to the USB port on your computer.
- If using Bluetooth® wireless technology, click your interface type and then select your device.
- Prepare for data collection:
- Vernier Graphical Analysis®: Launch the app, if necessary, and click Sensor Data Collection.
- LabQuest® App: Choose New from the File menu.
The software will identify the sensor and load a default data-collection setup. You are now ready to collect data.
Need Additional Information?
Visit the following link:
Using the Product
- Connect the Flow Rate Sensor to the interface and start the data-collection program.
- Collect stream flow data
- Change the mode to Selected Events. Check the box to average over 10 seconds.
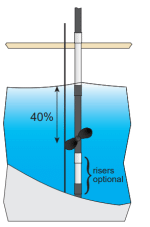
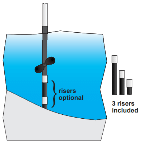
- Submerge the impeller of the Flow Rate Sensor to about 40% of the depth measured at each section. If necessary, use the plastic risers that are included with the flow rate sensor to support the sensor on the stream bed. The risers make it easier to keep the impeller of the sensor in the same spot and oriented in the same direction.
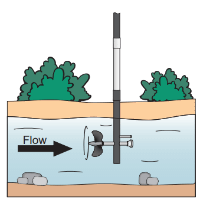
- Start data collection. Point the impeller of the sensor upstream (as shown below) and directly into the flow and click or tap Keep. Hold the sensor in place for 10 seconds while data are being collected. Once data collection is finished, the flow rate will be displayed.
- Move to the next sampling site and click or tap Keep.
- When done, click or tap Stop to end data collection.
Calculating Discharge
To determine the amount of water flowing in a stream, you need to measure the rate at which the water flows and the area the water occupies at a specific point in the stream. The discharge, or stream flow, is the flow rate multiplied by the area of water.
Flow Rate × Area of Cross Section = Discharge or Stream Flow
Detailed instructions are found in our Water Quality with Vernier lab book, www.vernier.com/wqv
Sediment Transport
The amount of sediment and maximum particle size that can be transported by moving water is related to the flow velocity. Therefore, flow velocity data obtained using the Flow Rate Sensor can be used to determine what size particles will stay in motion at a particular flow velocity. This chart, derived from accumulated observed data, shows that for a given flow velocity there is a range of behavioral possibilities for sediment particles lying on the bed, or entrained within the flow, of a stream.
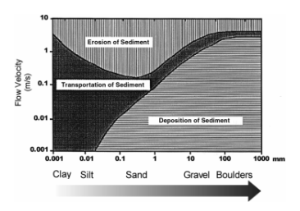
At a measured flow velocity of 1 m/s, silt and sand (though not compacted clay) will be eroded from the stream bed and transported downstream. At the same velocity, all sediment particles between 10 mm and 100 mm that were already in motion will continue in motion. Particles greater than 100 mm will be deposited. A Flow Rate Sensor can be a valuable observational tool when used in sediment transportation studies.
Describing Flows
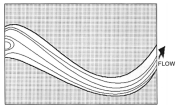
Using the Flow Rate Sensor, it is possible to map flow characteristics of a stream by taking measurements at different spots and depths. To understand the flow characteristics within streams of moving water, it is helpful to construct Stream Lines and Vector Lines. The illustration shown here shows how Stream Lines depict possible paths of a single fluid particle.
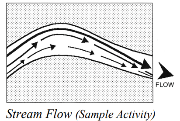
Vector Lines represent both the flow rate and direction. The longer and broader the line, the greater the flow velocity. Vector Lines convey useful information about the stream flow characteristics.
Videos
Calibrating the Sensor
You do not have to perform a new calibration when using the Flow Rate Sensor. The sensor is calibrated prior to shipping.
Specifications
|
Range |
0 to 4.0 m/s (0 to 13 ft/s) |
|
Resolution |
0.0012 m/s |
|
Accuracy |
±1% of full scale reading |
|
Response Time |
98% of full-scale reading in 5 seconds, |
|
Temperature range (can be placed in) |
0 to 70 °C |
|
Stored Calibration Values |
slope: 1 m/s/V intercept: 0 m/s |
Care and Maintenance
When you have finished using the Flow Rate Sensor, simply rinse it with clean water and dry it using a paper towel or cloth. The probe can then be folded up and stored. To prolong the life of your Flow Rate Sensor, we recommend that the moving parts of the impeller rod be lubricated with WD-40®, or a similar lubricant, after every few field uses.
When using the impeller rod, avoid hitting the impeller blade on rocks and other hard surfaces. If the impeller blade is bent, it will decrease the accuracy of the sensor.
Do not wrap the cable tightly around the sensor for storage. Repeatedly doing so can irreparably damage the wires and is not covered under warranty.
How the Sensor Works
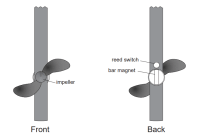
The Vernier Flow Rate Sensor measures the velocity of flowing water. When placed in a stream, as shown here, water flows against the blades of the impeller, causing it to turn. The faster the water flows, the faster the impeller turns. A bar magnet rotating with the impeller triggers a reed switch with each half rotation. The switch sends a pulse to the signal conditioning box, where the pulses are converted into a voltage that is proportional to flow rate. Flow rate can be measured in m/s or ft/s.
Tips
-
The plastic risers that come with the Flow Rate Sensor can be very helpful in keeping the sensor at the same orientation while taking measurements. When using the risers, simply place the bottom of the sensor rod against the stream bottom. If you are unsure which riser to use, start with the medium riser first and gauge the depth from there.
- When students are selecting sites to take flow measurements, they should choose a site where the stream is not split by rocks, partially submerged obstructions, or sand bars.
- The impeller of the flow rate sensor should always be pointing into the flow when measurements are being made. Students need to stand on the shore when taking measurements close to the shore, or stand as far downstream as possible from the sensor when placing the sensor in deeper water.
- Because stream flow is easily affected by weather conditions, it is important that good notes concerning date, time, and weather be taken whenever flow measurements are made.
Troubleshooting
For troubleshooting and FAQs, see www.vernier.com/til/1390
Safety
- Follow safety guidelines when students are working in or near water. Avoid sites where the water is deep or swift. Water with a flow velocity of 0.5 m/s or greater is considered to be swift. Water with a depth greater than the top of your knee should be considered deep.
- Never work alone around a stream. Students should always work with others in groups of 2–3. Do not allow students to wander away from their group. It is important to know where student groups are at all times. Students should not change locations without notifying their instructor first.
- Before using a particular site, it is best to survey the area for unseen dangers, such as unstable banks, dangerous obstacles in the stream, or fallen trees. Avoid these possible dangers.
- Always be careful when crossing a stream. If it looks dangerous, select another spot in the stream to cross.
- Students should wear warm, waterproof clothes when working in a stream. If possible, they should bring spare items such as dry socks that can be worn after working in the water. Prolonged exposure to cold waters can result in hypothermia, which can be a life-threatening condition.
Repair Information
If you have watched the related product video(s), followed the troubleshooting steps, and are still having trouble with your Flow Rate Sensor, contact Vernier Technical Support at support@vernier.com or call 888-837-6437. Support specialists will work with you to determine if the unit needs to be sent in for repair. At that time, a Return Merchandise Authorization (RMA) number will be issued and instructions will be communicated on how to return the unit for repair.
Warranty
Warranty information for this product can be found on the Support tab at www.vernier.com/flo-bta/#support
General warranty information can be found at www.vernier.com/warranty
Contact Support
Fill out our online support form or call us toll-free at 1-888-837-6437.

