Go Direct® Soil Moisture Sensor User Manual
Order Code: GDX-SM
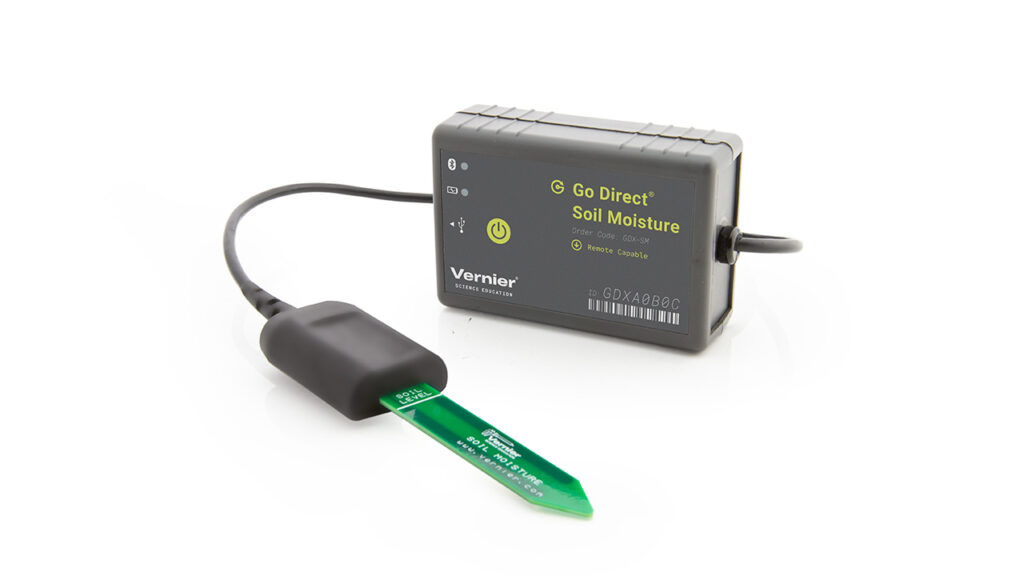
Go Direct Soil Moisture is used to measure the volumetric water content of soil. This makes it ideal for performing experiments in courses such as soil science, agricultural science, environmental science, horticulture, botany, and biology. Use Go Direct Soil Moisture to
- Measure the loss of moisture over time due to evaporation and plant uptake.
- Evaluate optimum soil moisture contents for various species of plants.
- Monitor soil moisture content to control irrigation in greenhouses.
- Enhance your Bottle Biology™ experiments.
Note: Vernier products are designed for educational use. Our products are not designed nor are they recommended for any industrial, medical, or commercial process such as life support, patient diagnosis, control of a manufacturing process, or industrial testing of any kind.
What's Included
- Go Direct Soil Moisture
- Micro USB Cable
Compatible Software
Choose a platform below to see its compatibility requirements.LabQuest
Interface LabQuest App LabQuest 3 Full support LabQuest 2 Full support 1 LabQuest Incompatible Compatibility Notes
Computers
Software Interface Graphical Analysis Graphical Analysis (Web App) No interface required Full support Full support LabQuest 3 Full support 1 Incompatible LabQuest 2 Full support 1 2 Incompatible Compatibility Notes
Chromebook
Software Interface Graphical Analysis (Web App) No interface required Full support iOS
Software Interface Graphical Analysis Graphical Analysis GW No interface required Full support Full support LabQuest 3 Full support 1 2 Full support 1 2 LabQuest 2 Full support 1 2 3 Full support 1 2 3 Compatibility Notes
Android
Software Interface Graphical Analysis Graphical Analysis GW No interface required Full support Incompatible LabQuest 3 Full support 1 2 Full support 1 LabQuest 2 Full support 1 2 3 Full support 1 3 Compatibility Notes
Python
Software Interface Python No interface required Full support Javascript
Software Interface Javascript No interface required Full support 1 Compatibility Notes
LabVIEW
Software Interface NI LabVIEW No interface required Full support
Quick Start: Vernier Graphical Analysis® and Bluetooth®
- Charge your sensor for at least 2 hours before first use.
- Turn on your sensor. The LED will blink red.
- Launch Graphical Analysis, then click Sensor Data Collection.
- Select your sensor from the list. The sensor ID is located on the sensor label near the bar code. Note: If you don’t see a list of available sensors, click WIRELESS. After selecting your sensor, click Pair.
- Click DONE. You are now ready to collect data.
Using other Vernier data-collection apps or want to connect via USB?
Visit www.vernier.com/start-go-direct
Note: This sensor also works with LabQuest 2 and LabQuest 3; it does not work with the original LabQuest.
Charging the Sensor
Connect Go Direct Soil Moisture to the included USB Charging Cable and any USB device for two hours.
You can also charge up to eight Go Direct Soil Moisture Sensors using our Go Direct Charge Station, sold separately (order code: GDX-CRG). An LED on each Go Direct Soil Moisture indicates charging status.
| Charging |
Orange LED next to the battery icon is solid while the sensor is charging. |
| Fully charged |
Green LED next to the battery icon is solid when the sensor is fully charged. |
Powering the Sensor
| Turning on the sensor |
Press button once. Red LED indicator next to the Bluetooth icon flashes when the unit is on. |
| Putting the sensor in sleep mode |
Press and hold button for more than three seconds to put into sleep mode. Red LED indicator next to Bluetooth icon stops flashing when sleeping. |
Connecting the Sensor
See the following link for up-to-date connection information:
Connecting via Bluetooth
| Ready to connect | Red LED next to the Bluetooth icon flashes when sensor is awake and ready to connect. |
| Connected | Green LED next to the Bluetooth icon flashes when sensor is connected via Bluetooth. |
Connecting via USB
| Connected and charging | Orange LED next to the battery icon is solid when the sensor is connected to Graphical Analysis via USB and the unit is charging. LED next to Bluetooth icon is off. |
| Connected, fully charged | Green LED next to the battery icon is solid when the sensor is connected to Graphical Analysis via USB and fully charged. LED next to Bluetooth icon is off. |
| Charging via USB, connected via Bluetooth |
Orange LED next to the battery icon is solid when the sensor is charging. Green LED next to the Bluetooth icon flashes. |
Identifying the Sensor
When two or more sensors are connected, the sensors can be identified by tapping or clicking Identify in Sensor Information.
Using the Product
Connect the sensor following the steps in the Quick Start section of the user manual.
Positioning the sensor
Figure 1 shows the proper placement of Go Direct Soil Moisture. The prongs should be oriented horizontally, but rotated onto their side, like a knife poised to cut food, so that water does not pool on the flat surface of the prongs.
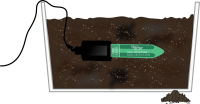
The horizontal orientation of the sensor ensures the measurement is made at a particular soil depth. The entire sensor can be placed vertically, but because soil moisture often varies by depth, this is not usually the desired orientation. To position the sensor, use a thin implement such as a trenching shovel to make the pilot hole in the soil. Place the sensor into the hole, making sure the entire length of the sensor is covered. Press down on the soil along either side of the sensor with your fingers. Continue to compact the soil around the sensor by pressing down on the soil with your fingers until you have made at least five passes along the sensor. This step is important, as the soil adjacent to the sensor surface has the strongest influence on the sensor readings.
Removing the Sensor
When removing the sensor from the soil, do not pull it out of the soil by the cable. Doing so may break internal connections and make the sensor unusable.
What is Volumetric Water Content?
In very simplified terms, dry soil is made up of solid material and air pockets, called pore spaces. A typical volumetric ratio would be 55% solid material and 45% pore space. As water is added to the soil, the pore spaces begin to fill with water. Soil that seems damp to the touch might now have 55% minerals, 35% pore space and 10% water. This would be an example of 10% volumetric water content. The maximum water content in this scenario is 45% because at that value, all the available pore space has been filled with water. This soil is referred to as being saturated, because at 45% volumetric water content, the soil can hold no more water.
Calibrating the Sensor
The Go Direct Soil Moisture Sensor has a stored calibration that will give good results.
Specifications
|
Range: |
0 to 45% volumetric water content in soil |
|
Operating temperature |
–40°C to +60°C |
|
Dimensions |
Dimensions: 8.9 cm × 1.8 cm × 0.7 cm (active sensor length 5 cm) |
|
USB specification |
2.0 |
|
Wireless specification |
Bluetooth 4.2 |
|
Maximum wireless range |
30 m (unobstructed) |
|
Battery |
300 mA Li-Poly |
|
Battery life (single full charge) |
~24 hours |
|
Battery life (long term) |
~500 full charge cycles (several years depending on usage) |
Care and Maintenance
Battery Information
Go Direct Soil Moisture contains a small lithium-ion battery. The system is designed to consume very little power and not put heavy demands on the battery. Although the battery is warranted for one year, the expected battery life should be several years. Replacement batteries are available from Vernier (order code:
GDX-BAT-300).
Storage and Maintenance
To store Go Direct Soil Moisture for extended periods of time, put the device in sleep mode by holding the button down for at least three seconds. The red LED will stop flashing to show that the unit is in sleep mode. Over several months, the battery will discharge but will not be damaged. After such storage, charge the device for a few hours, and the unit will be ready to go.
Exposing the battery to temperatures over 35°C (95°F) will reduce its lifespan. If possible, store the device in an area that is not exposed to temperature extremes.
Water Resistance
Important: Go Direct Soil Moisture is water resistant but not waterproof. It should never be immersed in water.
If water gets into the device, immediately power the unit down (press and hold the power button for more than three seconds). Disconnect the sensor and charging cable, and remove the battery. Allow the device to dry thoroughly before attempting to use the device again. Do not attempt to dry using an external heat source.
Troubleshooting
For troubleshooting and FAQs, see www.vernier.com/til/20529
Repair Information
If you have watched the related product video(s), followed the troubleshooting steps, and are still having trouble with your Go Direct Soil Moisture, contact Vernier Technical Support at support@vernier.com or call 888-837-6437. Support specialists will work with you to determine if the unit needs to be sent in for repair. At that time, a Return Merchandise Authorization (RMA) number will be issued and instructions will be communicated on how to return the unit for repair.
Accessories/Replacements
| Item | Order Code |
|---|---|
|
CB-USB-MICRO |
|
|
CB-USB-C-MICRO |
|
| Go Direct 300 mAh Replacement Battery |
GDX-BAT-300 |
Warranty
Warranty information for this product can be found on the Support tab at www.vernier.com/gdx-sm/#support
General warranty information can be found at www.vernier.com/warranty
Contact Support
Fill out our online support form or call us toll-free at 1-888-837-6437.