Shop
- Engineering
- Arduino
- Using Vernier Sensors with Arduino Guide
- Projects and Ideas
- Laser Pointer Controlled by a Motion Detector
Laser Pointer Controlled by a Motion Detector
This is an interesting project that is a lot of fun and can help teach math. Thanks to Fred Thomas of Math Machines for the original idea.
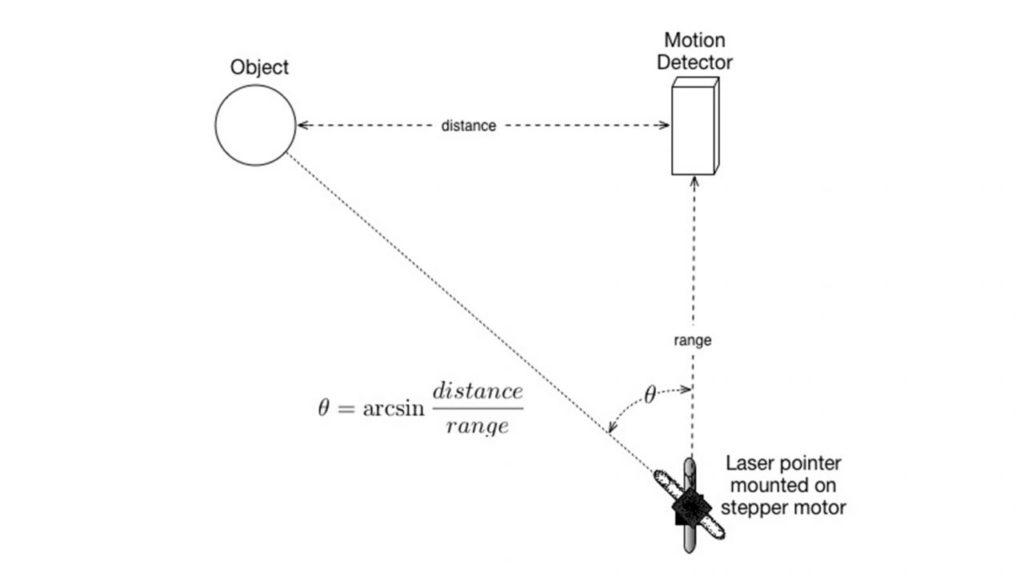
In this project, we mount a laser pointer on top of a servo motor. The servo motor can “aim” the laser and we will try to hit an object with the beam. A Motion Detector is used to locate the object. The setup is as shown below:

The distance from the servo motor/laser pointer to the Motion Detector is referred to as the Range in this project. The Distance is measured with the Motion Detector and since we have a right triangle here, the angle to aim the laser can be determined by an arctangent calculation. The Arduino math library allows for this calculation. We also use the Arduino servo library to control the motor.
Once you have things set up properly, the laser beam should be able to hit the object, even if it is moving at a modest speed.
On GitHub, we also have a slightly more complex version of the program called VernierLaserTrackerAutoOn. This program assumes that the power to the laser pointer is supplied by the D6 pin of the Arduino (pin DIO0) on BTD connector 2. This makes for an even better demonstration. The laser pointer only goes on when a “target” is in the area.
/*VernierLaserTracker  (v 2018.5)
Monitors the position of an object using a Vernier Motion Detector
and then aims a laser pointer mounted on a servo motor at the object.

This sketch uses three Arduino libraries. To read the Motion Detector, it uses
the VernierLib library. Because of the use of a trig function (arctangent) in the
calculations, this sketch requires the math.h library. It also requires the servo
library to control the servo motor.

See www.vernier.com/arduino for more information.
 */
#include <math.h>
#include <Servo.h>
Servo myservo;  // create servo object to control a servo
#include "VernierLib.h"
VernierLib Vernier;
float distance = 0;// distqnce in cm
int Range=100; //distance in cm from Laser Pointer/Servo motor to Motion Detector
const int Laser = 6;//laser pin, connect laser to pin 6 of the Arduino, which is the first line on Digital 2

void setup()
{
  myservo.attach(9);  // attaches the servo on pin 9 to the servo object
  // initialize serial communication at 9600 bits per second:
  Serial.begin(9600);
  Serial.println(" ");
  Serial.print("Distance");
  Serial.print("\t"); //tab character
  Serial.print ("Angle");
    Serial.print("\t"); //tab character
  Serial.println ("Angle");
  Serial.print("centimeters");
  Serial.print("\t"); // tab character
  Serial.print ("radians");
  Serial.print("\t"); // tab character
  Serial.println ("degrees");
}
void loop()
{
  float ArcTan=0;
  double Angle =0;
  float Degrees;
  int ServoSetting;
    distance = Vernier.readMotionDetector();
  Serial.print(distance);
  Serial.println(" cm");
  if (distance < 120)
   {
     digitalWrite(Laser, HIGH);// if closest item is within 120 cm it turns laser on
   }
 else digitalWrite(Laser, LOW);
  delay(100);//delay a tenth of a second

  Serial.print(distance);
  Serial.print("\t"); // tab character
  ArcTan = atan(distance/Range);
  Serial.print(ArcTan);
  Serial.print("\t"); // tab character
  Degrees= ArcTan*57.29578; //convert radians to degrees
  Serial.println(Degrees);
  ServoSetting =Degrees;
  myservo.write(ServoSetting); // sets the servo position according to the scaled value
  delay(50); //delay a bit
}
