Shop
- Engineering
- Arduino
- Using Vernier Sensors with Arduino Guide
- Projects and Ideas
- DCU-Controlled Birthday Candle
DCU-Controlled Birthday Candle
This is a fun project to build an electronic birthday candle that you can blow out.
The candle is really an LED. So how do you blow out an LED? A simple Arduino sketch using a temperature sensor and a Digital Control Unit (DCU) does the job.

Step 1
Wire a 100-ohm resistor to the +5V and ground lines on the DCU so that current flows through it, and it becomes slightly warm. Glue a Vernier Surface Temperature Sensor to the resistor so that it measures the temperature of the resistor. After a few minutes, the resistor and the Surface Temperature reach an equilibrium temperature that is somewhat hotter than room temperature. Mount the resistor/Temperature Sensor combination near the LED candle. If you then blow on the setup (as if you were blowing out a candle), the temperature reading drops because the air you are moving by the resistor carries away some heat.
Step 2
It is not too hard to write an Arduino sketch that turns off a DCU output line that powers the birthday candle LED when the temperature drops below a threshold value. The simplest version of the program has the threshold temperature built into the sketch using a code something like the example to the right.
The tricky part of such a sketch is selecting the right threshold temperature.
if (SensorReading < Threshold) {
digitalWrite (Candle, LOW); // This turns off the LED
} else {
digitalWrite (Candle,HIGH); // Leave the :LED on
}
Step 3
The VernierBirthdayCandle sketch we provide uses a different approach to setting the threshold temperature. When you run it, the temperature is read continually. Current runs through the 100-ohm resistor and the LED “candle” is illuminated. The temperature reading increases as the resistor heats up the Temperature Sensor. You can check the temperature using the Serial Monitor. After a couple minutes, the user can press the D12 button on the Vernier Arduino Interface Shield to set the threshold temperature. After that, the sketch will monitor the temperature and turn off the LED if the temperature drops by 2°C. Note that the “candle” will go out but come back on if when the temperature again goes over the threshold temperature.
Step 4
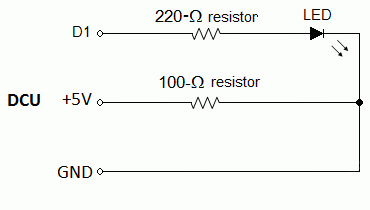
The wiring to the DCU is shown to the right. Note that the DCU should be plugged into the Digital 2 connector on the Vernier Interface Shield. The DCU requires its own power supply.

Figure 1: Birthday Candle Wiring Diagram
Step 5
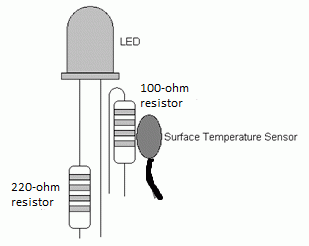
Wire the LED and resistors to the DCU as shown in the diagram below. Note that the flat side of the LED should be connected to GND.
Glue the tip of the Surface Temperature Sensor to the 100 Ω heating resistor. If you have heat-conducting Epoxy cement available, use it. If not, use a small dab of any adhesive.
Use short lengths of heat shrink tubing or plastic electrical tape to make sure wires do not touch were they should not. The Surface Temperature Sensor and heating resistor should remain exposed to the open air.
Mount the whole LED/resistor/temperature sensor combination on top of a birthday cake so that it looks a bit like a birthday candle. Sometimes we use a real birthday candle and try to position the LED right at the top of it so it roughly looks like a flame.
The first time you run the sketch, have the Arduino connected to a computer so you can monitor the temperature reading. Make sure the temperature of the reading increases. In our testing, it usually reaches about 40°C before reaching equilibrium. Press the D12 button and give the birthday candle a try.

Figure 2: Birthday Candle LED Setup
/*
DCU-Controlled Birthday Candle (v 2016.05)
Reads the temperature from a Vernier Surface Temperature Probe (STS-BTA)
connected to the BTA 1 connector. As written, the readings will be displayed every half second.
Change the variable TimeBetweenReadings to change the rate.

We use the Steinhart-Hart equation (in the function Thermistor) to determine temperature
from the raw A/D converter reading. Because of the use of log functions, in the Steinhart-Hart
equation, this sketch requires the math.h library.

This sketch controls a "fake birthday candle", which is really an LED connected to line 1 of the
Digital Control Unit (DCU).

Run the sketch and allow the temperature to stablize. When it has, press the D12 button on the Vernier
Interface Shield. This will establish a threshold temperature. The candle should go out any time the
temperature reading drops 2 degrees from this threshold temperture.

See www.vernier.com/engineering/stem/sensors/temperature-sensor/
for more information on how thermistors are read.

See www.vernier.com/arduino for more information.
 */
#include <math.h>
int ThermistorPIN =0;// Analog Pin 0
int TimeBetweenReadings = 500; // in ms
int ReadingNumber=0;
int buttonPin= 12; // analog input pin to use as a digital input
int LED= 13; // digital output pin for LED 1 indicator
int Candle =6;// this is the line to control the candle if the using line 1 of the DCU in Digital 2
float Threshold= 0; //Threshold temperature, initialize to 0 so candle is on
int buttonState = 0;//variable for reading the pushbutton status
void setup()
{
  Serial.begin(9600);
  pinMode(LED, OUTPUT); //LED on SparkFun Vernier Shield
  pinMode(6, OUTPUT); // set Arduino line 6 for output, which is DCU line 1 (if DCU is connected to Digital 2)
  // Set up button input pin;
  pinMode(buttonPin, INPUT_PULLUP);
  Serial.println("Vernier Format 2");
  Serial.println("Temperature Readings taken using Ardunio");
  Serial.println("Data Set");
  Serial.print("Time");//long name
  Serial.print("\t"); //tab character
  Serial.print ("Temperature");
  Serial.print("\t"); //tab character
  Serial.println ("Threshold");
  Serial.print("t");
  Serial.print("\t"); //tab character
  Serial.println ("Temp"); //short name
  Serial.print("seconds");
  Serial.print("\t"); // tab character
  Serial.print ("degrees C");
  Serial.print("\t"); // tab character
  Serial.println ("degrees C");
}
void loop()
{
  float Time;
  int Count; //reading from the A/D converter (10-bit)
  float Temp; //the print below does the division first to avoid overflows
  Serial.print(ReadingNumber/1000.0*TimeBetweenReadings);
  Count=analogRead(ThermistorPIN);       // read count from the A/D converter
  Temp=Thermistor(Count);       // and  convert it to CelsiusSerial.print(Time/1000); //display in seconds, not milliseconds
  Serial.print("\t"); //tab character
  Serial.print(Temp,1);   // display temperature to one digit
  Serial.print("\t"); //tab character
  Serial.println (Threshold,1);
  if (Temp<(Threshold)) {
    digitalWrite(Candle, LOW); //turn off candle
    digitalWrite(LED, LOW); //turn off LED, also
  }
  else {
    digitalWrite (Candle, HIGH);//turn on candle
    digitalWrite(LED, HIGH); //turn on LED, also
  }
  //Special section to set threshold, if button is pressed:
  buttonState = digitalRead(buttonPin);
  // if it is, the buttonState is LOW:
  if (buttonState == LOW)
   {
     Threshold = Temp-2;// set this as the threshold temperature, 2 degrees C below current temp
     Serial.print("Threshold set as ");
     Serial.print (Threshold,1);
     Serial.println(" degrees C");
    }// end of special operatures done if button is down

   ReadingNumber++;
   delay(TimeBetweenReadings); // Delay a bit...
}

float Thermistor(int Raw) //This function calculates temperature from ADC count
{
 /* Inputs ADC count from Thermistor and outputs Temperature in Celsius
 *  requires: include <math.h>
 * There is a huge amount of information on the web about using thermistors with the Arduino.
 * Here we are concerned about using the Vernier Stainless Steel Temperature Probe TMP-BTA and the
 * Vernier Surface Temperature Probe STS-BTA, but the general principles are easy to extend to other
 * thermistors.
 * This version utilizes the Steinhart-Hart Thermistor Equation:
 *    Temperature in Kelvin = 1 / {A + B[ln(R)] + C[ln(R)]^3}
 *   for the themistor in the Vernier TMP-BTA probe:
 *    A =0.00102119 , B = 0.000222468 and C = 1.33342E-7
 *    Using these values should get agreement within 1 degree C to the same probe used with one
 *    of the Vernier interfaces
 *
 * Schematic:
 *   [Ground] -- [thermistor] -------- | -- [15,000 ohm resistor] --[Vcc (5v)]
 *                                     |
 *                                Analog Pin 0
 For the circuit above:
 * Resistance = ( Count*RawADC /(1024-Count))
 */
 long Resistance;
 float Resistor = 15000; //fixed resistor
// the measured resistance of your particular fixed resistor in
// the Vernier BTA-ELV and in the SparkFun Vernier Adapter Shield
// is a precision 15K resisitor
  float Temp;  // Dual-Purpose variable to save space.
  Resistance=( Resistor*Raw /(1024-Raw));
  Temp = log(Resistance); // Saving the Log(resistance) so not to calculate  it 4 times later
  Temp = 1 / (0.00102119 + (0.000222468 * Temp) + (0.000000133342 * Temp * Temp * Temp));
  Temp = Temp - 273.15;  // Convert Kelvin to Celsius
  return Temp;                                      // Return the Temperature
}
